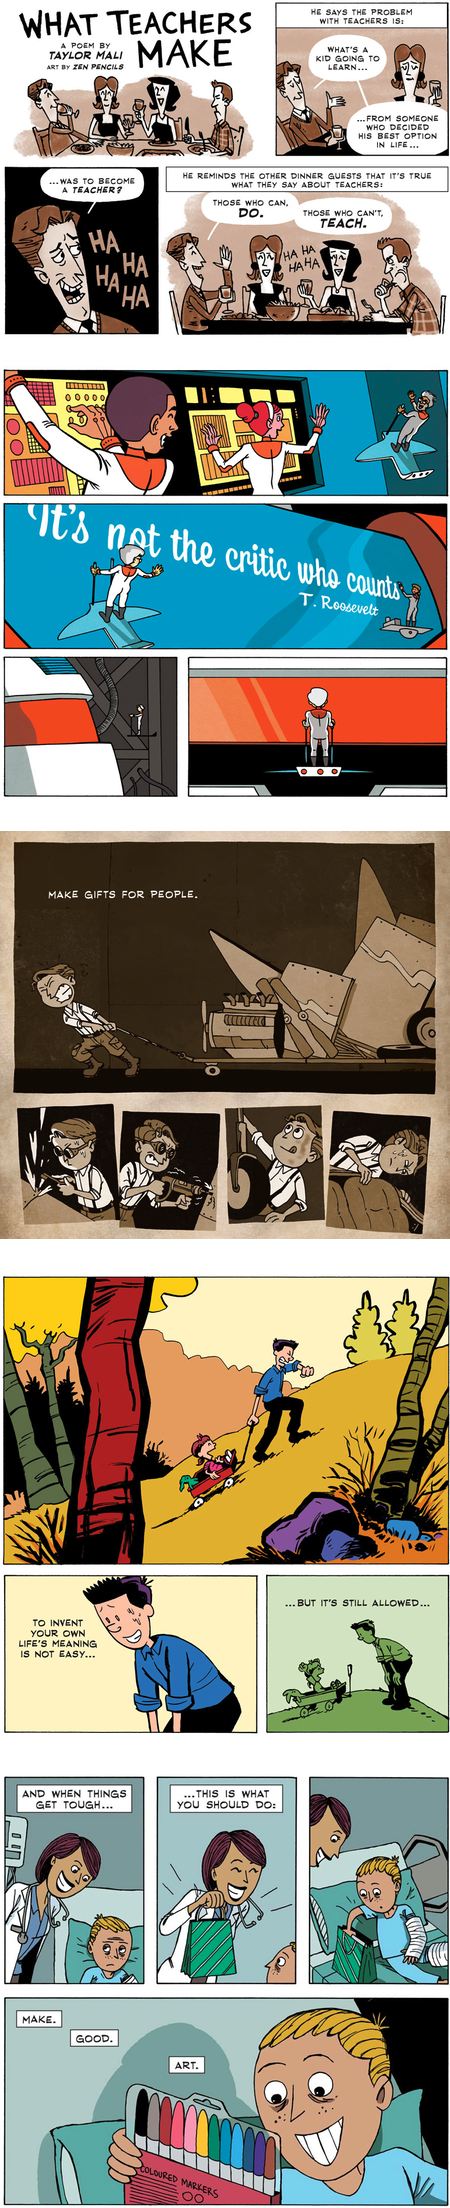
我们有一个很棒的教程是由我们的一个读者,来自巴拿马的Chanito发来的。在本教程中,他将向您展示如何使用adobeillustrator、Cinema 4D和adobephotoshop创建一个好的3D爆炸模型。我们将使用基本的工具来制作这个艺术品。1打开adobeillustrator,找到你想要在作品中使用的字体,在本例中,我使用了Xirod字体并稍微调整了一下。在adobeillustrator 8中创建大纲并保存它。(电影4D只是在这个adobeillustrator版本中打开向量)。第2步去电影院,打开你的Illustrator文件,当你在电影院打开它的时候,你可以看到它在一个组里面。你需要将它们分开,并将挤出的NURBS添加到每个单词的字母中。然后,当你把每个字母都挤出来的时候,你需要添加灯光(我用了两个区域的灯,在前面和左边)和目标相机(可选的,你可以使用任何你想要的)。第三步,我们有我们的3D文本,在切换到Photoshop之前,我们需要添加更多的细节。我们将复制我们的3D对象8次,使它可编辑,我们将添加爆炸和粉碎。您需要使用设置来查看您想要的3D文本是什么样的。只需要应用3次爆炸和3次碎片,并进行预览,你就会看到在哪里可以添加更多的细节和不需要的地方。步骤4到渲染设置,并设置如下设置。使渲染和保存在300 DPI TIFF格式与Alpha通道。步骤5将渲染变成Photoshop,进入通道窗口并选择Alpha通道。做出你的选择,剪切你的3D文本并粘贴到另一个图层。然后你就可以使用你的3D文本和背景了。第六步,我们将创建背景,并绘制一些深蓝色的区域。我使用基本的软笔刷和50%的不透明度来达到我想要的效果。第7步,我们将在背景中添加更多细节,我们还需要在3D文本后面创建一些亮点,让它脱颖而出。第8步,为我们的3D文本添加一些颜色。你可以用不同的方法来做。我只是用了基本的软笔刷,涂上了3D字母,做了一些面具。步骤9我们需要在3D字母前面做一个特殊的效果。要做到这一点,选择渐变工具并改变模式。在不同的方向上做梯度。然后,选择文本并在这个效果层中制作一个图层蒙版。将混合模式转换为柔和光和不透明度到70%步骤10,选择3D文本,去修改-合同,使用10到20像素。删除然后取消选择和去效果-模糊-动态模糊使用角度:15和60到70像素之间的距离。现在,我们将为我们的3D文本添加更多的细节。选择一种好的刷子和油漆,无论你想去哪里。要想产生爆炸的背面,你需要在文字后面加上碎玻璃。添加一些亮点让它脱颖而出。步骤12添加一些阴影在3D文本与多边形套索工具和渐变工具黑色到透明。现在,在3D文本中添加一些裂纹画笔,使爆炸更加真实。在你想要刹车的信上加个裂口,在我的例子里,是x。步骤14在每个字母的边框上添加亮点,让它有真正的爆炸感。为了创造爆炸的开始,在x的内角加上一个迷你爆炸刷。15 .用不同的方法在爆炸点做一些线条和火焰。用不同的颜色让它看起来更漂亮。步骤16在你的3D文本上添加碎玻璃图像,并将混合模式更改为叠加。复制它,去编辑-转换-翻转水平和改变混合模式到正常。这是最终的图像。希望您喜欢本教程。

We have a great tutorial sent by one of our readers, Chanito from Panama. In this tutorial he will show you how to create a good 3D type explosion with Adobe Illustrator, Cinema 4D and Adobe Photoshop. We will use basic tools to make this artwork. Good Luck!!! For more information visit Chanito's Deviantart at http://chanito.deviantart.com/Step 1 Open Adobe Illustrator and find the font that you want to use in your artwork, in this case I used Xirod Font and tweaked it a little. Make it outline and save it in Adobe Illustrator 8. (Cinema 4D just open vectors in this Adobe Illustrator version). Step 2Go to Cinema 4D and open your Illustrator file, when you open it in Cinema 4D you can see that it is inside of a group. You need to ungroup them and add the extrude NURBS to each letter of your word. Then when you have each letter with extrude you need to add lights (I used 2 area lights, in the front and the left side) and target camera (optional, you can use whatever you want).Step 3Well, we have our 3D text and we need to add more details before we go over to Photoshop. We're going to duplicate our 3D object 8 times to make it editable and we are going to add explosion and shatter. You need to play with the settings to see how you want your 3D text to look like. Just apply 3 explosions and 3 shatters to it and make a preview, you will see wher
e to add more details and wher
e not to. Step 4Go to render settings and put these following settings. Make the render and save in 300 DPI TIFF format with Alpha Channel. Step 5 Take the render into Photoshop, go to the Channels windows and choose the Alpha Channel. Make your selection, cut your 3D text and paste it in another layer. Then you can work just with your 3D text and after, with your background.Step 6 We're going to create the background and paint some areas with dark blue. I used the basic soft brush and 50% opacity to achieve the effect that I wanted.Step 7 Now we're going to add more details to the background and we also need to create some highlights behind the 3D text to make it stand out.Step 8 Time to add some color to our 3D text. You can do this in different ways. I just used the basic soft brush and painted over the 3D letter and made some masks.Step 9 We need to do a special effect to apply in front of our 3D letters. To do this, choose the Gradient Tool and change the mode to Difference. Make gradients in different directions. After, select the text and make a layer mask in this effect layer. Change the blend mode to Soft Light and Opacity to 70%Step 10 Next, select the 3D text, go to Modify - Co
ntract and use 10 to 20 pixels. Delete then deselect and go to Effects - Blur - Motion Blur use Angle: 15 and Distance between 60 to 70 pixels. Step 11Now we'll add more detail to our 3D text. Choose a good splatter brush and paint wher
ever you want. To generate the back of the explosion you need to add broken glasses behind text. (http://psdtuts.s3.amazonaws.com/208_Break_Down/pieces.png). Add some highlights to make it stand out.Step 12 Add some shadows inside of the 3D text with the Polygo
nal Lasso Tool and the Gradient Tool in Black to Transparent.Step 13 Now add some crack brushes in the 3D text to make the explosion more real. Put a crack on the letter you want to brake, in my case, the x.Step 14 Add highlights on the border of each letter to give it a real explosion feeling. To create the beginning of the explosion add a mini explosion brush to the inside corner of the x.Step 15 Make some lines and flares in the explosion point in different ways. Use different colors to give it a great look. Step 16 Add the broken glass image on top of your 3D text and change the Blend Mode to Overlay. Duplicate it, go to Edit - Transform - Flip Horizo
ntal and change the Blend Mode to Normal.FINAL This is the final image. Hope you enjoyed this tutorial! Typography tutorial photoshop illustrator cinema 4D 3d
 19
19
 设计欣赏
设计欣赏
 行业资讯
行业资讯
 行业资讯
行业资讯
 行业资讯
行业资讯
 设计欣赏
设计欣赏
 行业资讯
行业资讯
 行业资讯
行业资讯
 行业资讯
行业资讯